
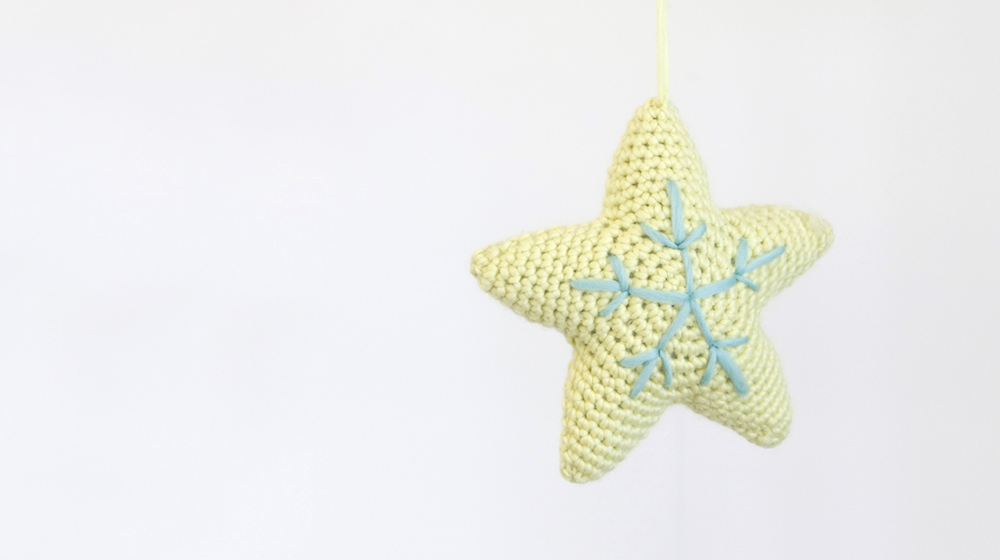
Today we offer you the free pattern to make a crochet star inspired by Scandinavian design. Perfect as a Christmas decoration, but also as a toy for children. It is made with a single ball of Piuma yarn using the amigurumi technique. After working the centre, the tips are worked directly onto the Star without the need for stitching. You can also enhance the Star with embroidery. Here a stylized snowflake has been chosen, once again using Piuma yarn.
Stars are one of the most fascinating features of space. A luminous celestial body that shines with its own light because it is made of incandescent matter. You can see them with the naked eye because of how bright they shine, they form the constellations that have evocative names like Ursa Minor, Cassiopeia or Cygnus. The stars that fall and that we wish upon, the ones that guided vessels towards land before the arrival of the satellites.
The stars are so loved and admired, that they have become a universal ideogram. A symbol that recalls freedom, eternity, and hope.
The exclusive pattern is designed by Kate Alinari.
Shall we begin?
MATERIALS
Piuma yarn col. Light 100 g / 3.5 oz
Piuma yarn col. Paradise 10 g / 3.5 oz
Crochet hook n° 4 EU / G-6 US
Padding wadding 30 g / 1 oz
Wing needle with large eye
Stitch marker
GAUGE
The first 4 rounds of the centre of the star correspond to 5 cm / 2".
The gauge is not crucial for this project, but getting the indicated measurements and using the recommended quantity of yarn is recommended.
STITCHES USED
Chain
Single crochet
Slip stitch
Decrease:
two single crochets closed together
LEVEL OF DIFFICULTY
Intermediate
DIMENSIONS OF FINISHED PIECE
The star has a diameter of approximately 18 cm / 7.1"
NOTE
The star is worked with the amigurumi technique, it is worked in a spiral, without turning over the piece and without closing the rounds with a slip stitch.
To recognize the beginning and end of the round, you may find it useful to place a stitch marker in the last stitch of the first round and to move to each subsequent round as the piece expands.

Start the project with the Piuma yarn col. Light by making a magic ring.
Round 1 (right side): 1 chain (does not count as the first stitch from here on), 6 single crochets in the ring [6 single crochets]
round 2: 2 single crochets in each stitch from the previous round [12 single crochets]
round 3: * 1 single crochet in the following stitch, 2 single crochets in the following stitch*, repeat from * to * until the end of the round [18 single crochets]
round 4: * 1 single crochet in the following 2 stitches, 2 single crochets in the following stitch*, repeat from * to * until the end of the round [24 single crochets]
round 5: * 1 single crochet in the following stitch, 2 single crochets in the following stitch, 1 single crochet in the following 2 stitches*, repeat from * to * until the end of the round [30 single crochets]
round 6: * 1 single crochet in the following 4 stitches, 2 single crochets in the following stitch*, repeat from * to * until the end of the round [36 single crochets]
round 7: *work 1 single crochet in the following 5 stitches, 2 single crochets in the following stitch, 1 single crochet in the following 2 stitches, 2 single crochets in the following stitch*, repeat from * to * 5 times, 1 single crochet in the 5 following stitches, 1 single crochet in the following stitch, 2 single crochets in the following 2 stitches. [45 single crochets]
Cut the thread.
At this point, before moving on to making the first point on the star, you must repeat this entire process to make the second centre of the star.
Take the first centre you made and start working with the yarn from the right side as follows.
Leave a long thread of Piuma yarn col. light to sew and start working in the first stitch of round 7 of the centre of the star.
Round 1 (right side): work 1 chain stitch, 1 single crochet in the same stitch and in the following 8 stitches, take the second piece you made from the centre of the star, and from the right work 1 single crochet in the first 9 stitches, do not work the remaining stitches. [18 single crochets]
Continue working in a spiral.
Round 2 and 3: 1 single crochet in each stitch from the previous round [18 single crochets]
round 4: *1 decrease, 1 single crochet in the following 7 stitches*, repeat from * to * until the end of the round [16 stitches]
round 5: *1 decrease, 1 single crochet in the following 6 stitches*, repeat from * to * until the end of the round [14 stitches]
round 6: *1 decrease, 1 single crochet in the following 5 stitches*, repeat from * to * until the end of the round [12 stitches]
round 7: *1 decrease, 1 single crochet in the following 4 stitches*, repeat from * to * until the end of the round [10 stitches]
round 8: *1 decrease, 1 single crochet in the following 3 stitches*, repeat from * to * until the end of the round; 1 slip stitch in the following stitch. [8 links]
Cut the thread ensuring to leave a good length.
Thread the needle with the remaining thread, pass the needle through the loop in front of all the stitches on round 8 and tighten to close the hole that has formed. Pull the thread gently to prevent it from breaking.
Fasten and cut the thread.
Still from the right side and leaving a good length of yarn, start working in the first unworked stitch of round 7 of the centre of the star.
Round 1 (right side): 1 chain, 1 single crochet in the same stitch and the following 8 stitches, continue working on the second centre and still from the right side work 1 single stitch in the following 9 stitches, do not work the remaining stitches. [18 single crochets]
Continue working in a spiral.
From round 2 to round 8: repeat the same procedure used to create the first tip working rounds 2 to 8.
Before starting the final tip, fill the star well with the wadding. You will have to, however, fill in the last tip as youre working it.
With the thread left at the beginning of each point, thread the needle and close the small hole that remains between one point and the other. Pull the thread gently to prevent it from breaking.
Fasten and cut the thread.
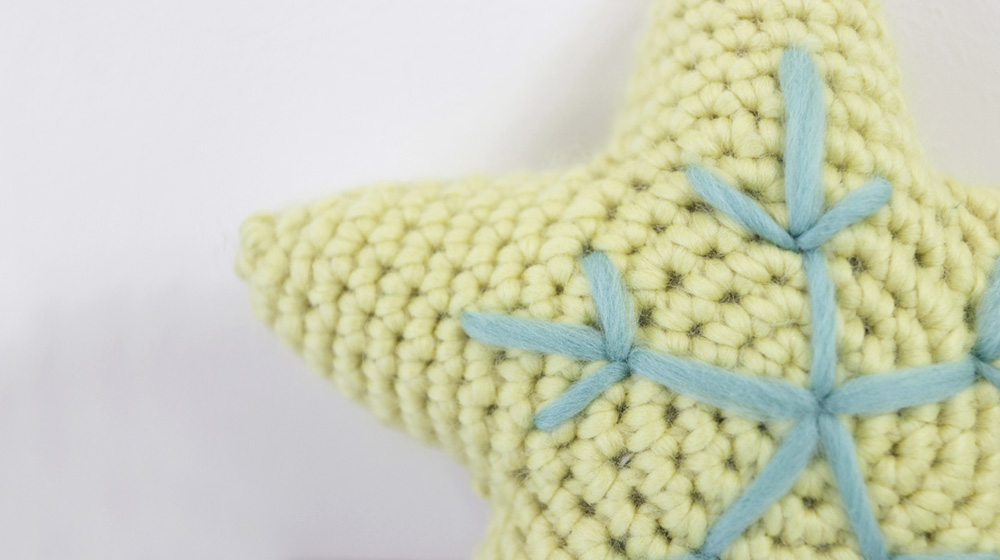
With Piuma yarn col. Paradise, embroider a snowflake on the star using back stitch.
Insert the needle into the centre of the star and embroider the first stitch by inserting the needle between rounds 4 and round 5, for the second stitch insert the needle between rounds 9 and round 10. For the two sticks on the side insert the 'needle between the first and second stitch and then diagonally skip 2 stitches.
Repeat this last step 4 times, like this, you will embroider the entire star.
Fasten and cut the yarn.
If you enjoyed making this crochet amigurumi star and above all enjoyed this technique, then we suggest you check out our area dedicated to the amigurumi technique. If, however, you are more of a beginner and would prefer a step-by-step guide, then we suggest purchasing one of our amigurumi kits.


WRITE A COMMENT