
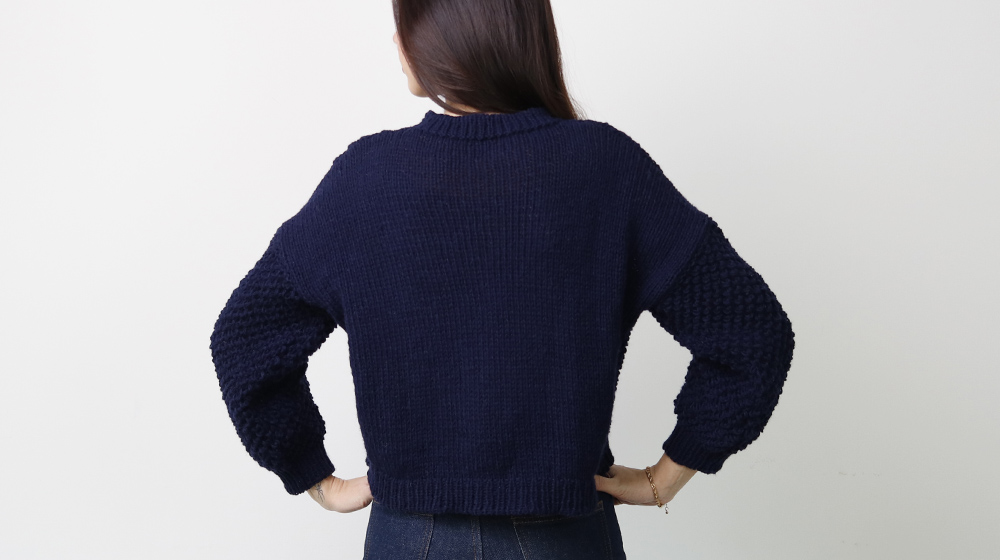
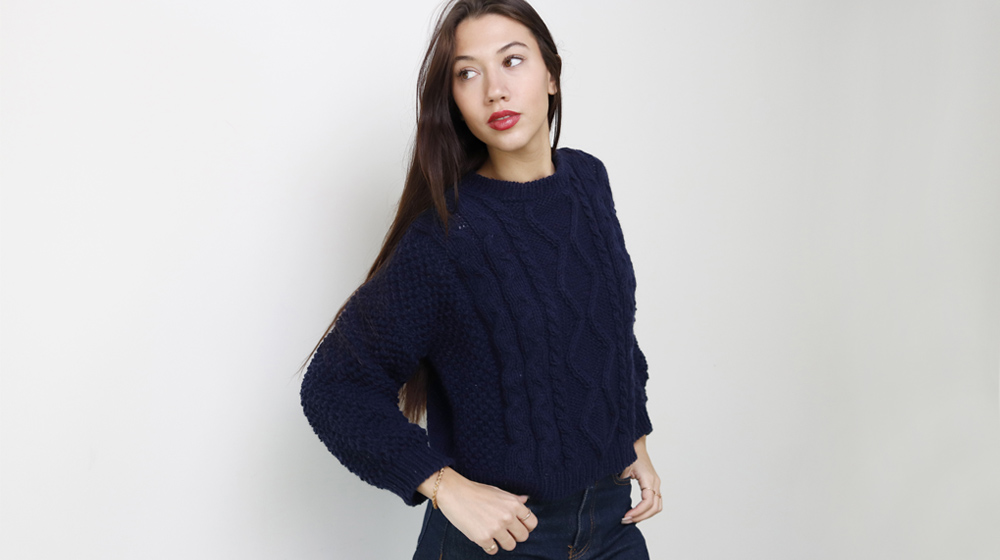
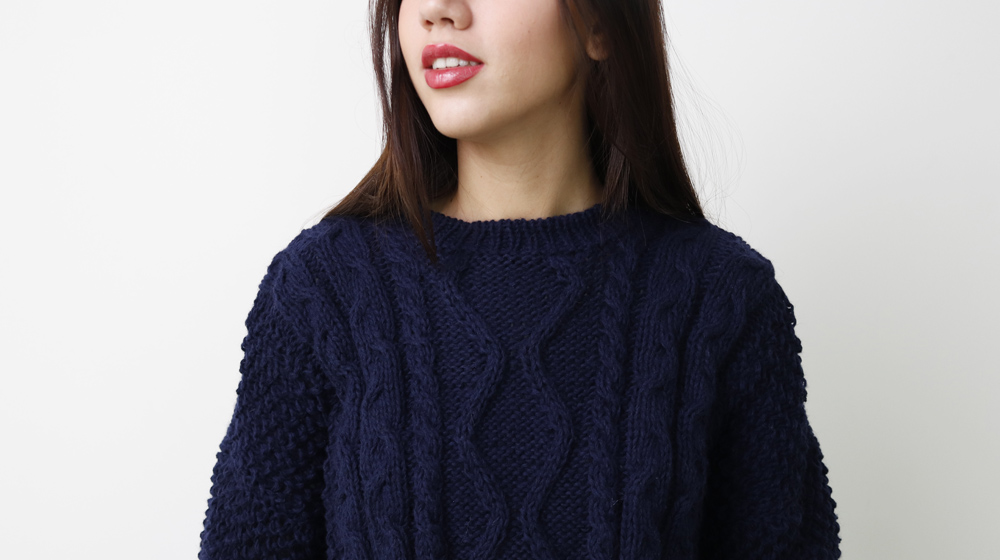
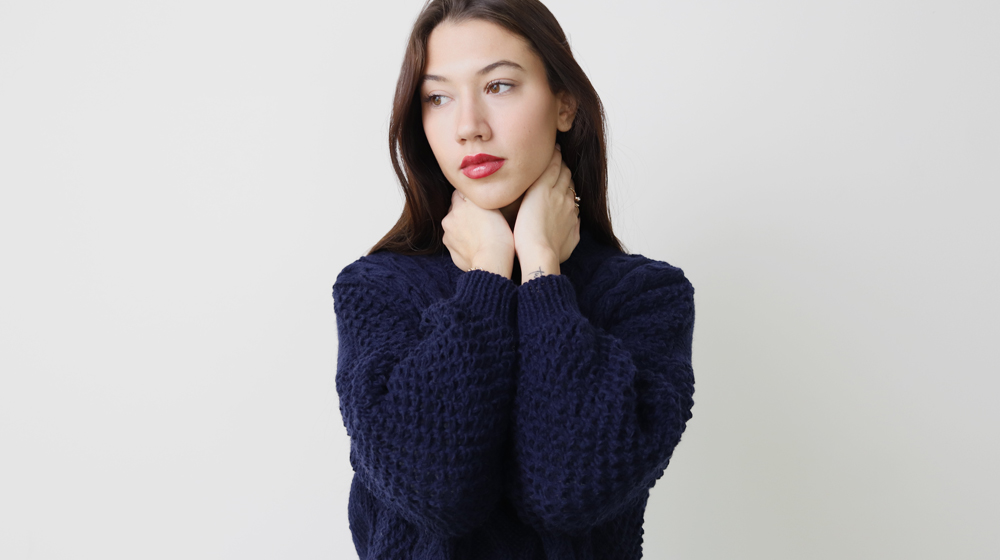
Today were introducing a sweater thats truly special to us. Not only for its classic cable-knit design that nods to British stylethough our sweater is super cropped for a modern twistbut also for the yarn its made with. Its crafted with Lagom, a testament to our commitment to supporting the circular economy, as its made from regenerated wool sourced from old garments.
Now, enjoy creating this sweater that can be worn countless times without losing the charm of a handmade piece crafted with premium yarn.
Visit our store to discover all the colors of Lagom and choose your favorite.
MATERIALS
Lagom yarn in color Tuareg, 400 g / 14.1 oz for size M
Knitting needles n° 4 EU / 6 US
Cable needle
Stitch holder
Wool needle
GAUGE STOCKINETTE STITCH
10 cm x 10 cm / 4" x 4"
14 stitches and 20 rows
STITCHES USED
Knit
Purl
Twisted knit stitch:
knit into the back loop of the stitch below.
Twisted purl stitch:
purl into the back loop of the stitch below.
Tubular cast-on:
using a provisional yarn of a contrasting color, cast on half the required stitches + 1. Then, with the working yarn, knit 1 stitch into each following stitch while making 1 yarn over between stitches.
Selvedge stitch:
on the right side of the work, slip the first stitch knitwise onto the right needle without knitting it; on the wrong side, purl the first stitch.
Knit increase:
lift the strand of yarn between the worked stitch and the next stitch and knit into the back loop.
Purl increase:
lift the strand of yarn between the worked stitch and the next stitch and purl into the back loop.
Tubular stitch:
row 1: repeat (knit 1, bring the yarn to the front, and slip the next stitch purlwise without working it) to the end of the row
row 2: knit the slipped stitches from the previous row and slip purlwise without working the knit stitches from the previous row.
1x1 rib:
alternate 1 knit stitch and 1 purl stitch on both the right and wrong sides of the work.
Stockinette stitch:
row 1: knit all stitches.
row 2: purl all stitches.
Repeat rows 1 and 2.
Embossed stitch:
row 1: 1 selvedge stitch, knit to the last stitch, 1 selvedge stitch
row 2: 1 selvedge stitch, repeat (yarn over, knit 2, pass the yarn over over the two knit stitches) to the last stitch, 1 selvedge stitch
row 3: work as row 1
row 4: 1 selvedge stitch, 1 knit stitch, repeat (yarn over, knit 2, pass the yarn over over the two knit stitches) to the last 2 stitches, 1 knit stitch, 1 selvedge stitch.
Repeat Rows 14.
2/2 right cable:
place 2 stitches on a cable needle held at the back of the work, knit 2, then knit the 2 stitches from the cable needle.
2/2 left cable:
place 2 stitches on a cable needle held at the front of the work, knit 2, then knit the 2 stitches from the cable needle.
2/1 right cable:
place 1 stitch on a cable needle held at the back of the work, knit 2, then knit the 1 stitch from the cable needle.
1/2 left cable:
place 2 stitches on a cable needle held at the front of the work, knit 1, then knit the 2 stitches from the cable needle.
2/1 reverse right cable:
place 1 stitch on a cable needle held at the back of the work, knit 2, then purl the 1 stitch from the cable needle.
1/2 reverse left cable:
place 2 stitches on a cable needle held at the front of the work, purl 1, then knit the 2 stitches from the cable needle.
Right cable pattern:
(worked over 22 base stitches)
row 1: repeat (purl 2, knit 6) twice, purl 2, knit 4
row 2 and all even rows up to row 12: knit 4, purl 2, repeat (knit 2, purl 6) twice
row 3: repeat (purl 2, knit 6) twice, purl 2, 1 left cable 2/2
row 5: repeat (purl 2, 1 left cable 2/2, knit 2) twice, purl 2, knit 4
row 7: work as row 3
row 9: work as row 1
row 11: repeat (purl 2, knit 2, 1 right cable 2/2) twice, purl 2, 1 left cable 2/2.
Repeat rows 112.
Central diamond pattern:
(worked over 19 base stitches)
row 1: purl 6, 1 right cable 2/1, purl 1, 1 left cable 1/2, purl 6
row 2 and all even rows up to row 20: knit the knit stitches and purl the purl stitches as they appear
row 3: purl 5, 1 right cable 2/1, purl 3, 1 left cable 1/2, purl 5.
(Continue according to provided pattern structure.)
Along with the instructional text, we also provide the charts in PDF format.
SIZES
Instructions are provided for sizes S (M, L).
FINISHED MEASUREMENTS FOR SIZE S (M, L)
Bust circumference: 100 (108, 118) cm / 40" (42.5", 46.5")
Total length: 50 (52, 54) cm / 20" (20.5", 21.3")
Length from underarm: 31 (32, 33) cm / 12.2" (12.6", 13")
Neck opening: 20 (20, 22) cm / 8" (8", 8.7")
Sleeve length: 39 (38, 37) cm / 15.3" (15", 14.6")
DIFFICULTY
Advanced
INSTRUCTIONS
The sweater is worked flat and consists of four pieces: the back, the front, and the sleeves. The neckline edge is worked afterward, following the shoulder seam.
With knitting needles n° 4 EU / 6 US, cast on 71 (77, 81) stitches using the tubular cast-on method. Then, work 2 rows in tubular knitting.
Row 3: (knit 1, purl 1) repeat to the last stitch, knit 1
row 4: (purl 1, knit 1) repeat to the last stitch, purl 1.
Rows 3 and 4 establish the 1x1 ribbing for the bottom border. Repeat these rows 4 more times, completing 12 rows in total, which measures approximately 5 cm / 2".
Row 13: knit 3 (6, 8), make 1 knit increase, (knit 5, make 1 knit increase) repeat to the last 3 (6, 8) stitches, knit 3 (6, 8); there are now 85 (91, 95) stitches
row 14: purl across.
Continue in stockinette stitch for another 88 (92, 96) rows, totaling 45 (47, 49) cm / 17.7" (18.5", 19.3") from the border. Bind off.
With knitting needles n° 4 EU / 6 US, cast on 71 (77, 81) stitches using the tubular cast-on method. Then, work 2 rows in tubular knitting and 9 rows of 1x1 ribbing as described for the back.
Row 12: (purl 1, knit 1) repeat to the last stitch, purl 1. at the same time, increase 20 stitches evenly across the row by making approximately 1 stitch increase every 3 (3, 4) stitches, either knit or purl to maintain the ribbing pattern; there are now 91 (97, 101) stitches
row 13: work 1 selvedge stitch, knit 13 (16, 18) stitches in textured stitch, then work the following patterns: right cable motif: over the next 22 stitches, follow chart A; central diamond motif: over the next 19 stitches, follow chart B; left cable motif: over the next 22 stitches, follow chart C; knit 13 (16, 18) stitches in textured stitch, and finish with 1 selvedge stitch.
Row 13 sets the stitch and pattern sequence. Repeat until you complete row 74 (78, 82), reaching a total length of 37 (39, 41) cm / 14.6" (15.4", 16.1") from the border.
Row 75 (79, 83): work the first 38 (41, 42) stitches in pattern, bind off the next 15 (15, 17) stitches for the neckline, and continue working the remaining 38 (41, 42) stitches in pattern
row 76 (80, 84): work the 38 (41, 42) stitches of the second side in pattern, leaving the first sides stitches on a stitch holder
row 77 (81, 85): bind off 1 stitch at the neckline, work in pattern to the end of the row
row 78 (82, 86): work in pattern as set.
Rows 77 and 78 (81 and 82, 85 and 86) establish the neckline shaping. Repeat these decreases 6 more times, completing Row 90 (94, 98) with 31 (34, 35) stitches remaining. Bind off.
Return to the first sides stitches and work as for the second side, reversing the shaping.
Start with the right sleeve.
With knitting needles n° 4 EU / 6 US, cast on 32 (36, 42) stitches using the tubular cast-on method. For the cuff, work 2 rows in tubular knitting and 12 rows in 1x1 ribbing: complete 14 rows, which measure approximately 6 cm / 2.4".
Row 15: knit 5 (8, 5), make 1 knit increase, (knit 1 (1, 2), make 1 knit increase) repeat to the last 5 (8, 5) stitches, knit 5 (8, 5)
row 16: purl across.
Continue in textured stitch until the sleeve measures 33 (32, 31) cm / 13" (12.6", 12.2") from the cuff. Bind off.
Knit the left sleeve following the same instructions as for the right sleeve.

Sew one shoulder seam, adjusting the wider front shoulder to fit the back shoulder width (due to the different stitch patterns on the front). For the neckline border, with US size 6 / EU size 4 needles, pick up an even number of stitches around the neckline. Work 6 rows in 1x1 ribbing and 2 rows in tubular knitting, then bind off using a tapestry needle and grafting technique. Sew the neckline border seam and the other shoulder seam (remember to adjust the front shoulder width to fit the back). Attach the top edge of each sleeve along the shoulder seams, aligning with the armholes. Close the underarm and side seams.


WRITE A COMMENT