
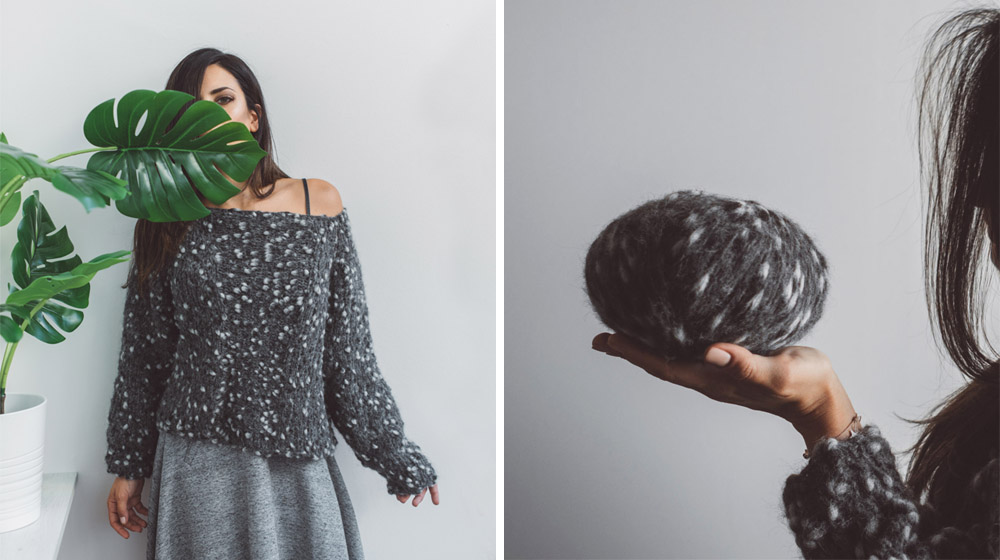
Next up, in the second tutorial dedicated to our Bonatti yarn, is a top down double face raglan sleeve sweater. We opted for a double face sweater as this yarn has a soft handle and a knobbly look that really stands out. Its really nice on, both the right way and inside out, giving you two slightly different versions from the original texture of the yarn.
This type of sweater is knitted in the round using circular needles, from top to bottom, in just once piece so it has the added advantage of being seamless. From the collar the stitches are gradually increased until the sleeves that are left hanging to then be picked up later.
The double face sweater is one size and just like the pom-pom hat, its been created exclusively for us by the Knitting for Breakfast girls. For this garment theyve chosen three stitches: knit, purl and rib, so its basic and easy enough for beginners too.
If this sweater, made with our Bonatti yarn, has got you interested, and you fancy matching it up with another garment, you should definitely read our tutorial on how to make a seamless beanie embellished with a pom-pom. Where, as well as explaining all the necessary steps to make the seamless hat, we also tell you a little bit about our Bonatti yarn, which is a mix of alpaca and wool that will keep you nice and snug this winter.
Now though, lets start the tutorial for a double face raglan sleeve sweater. Once its complete youll see that it goes really well with either a loose skirt (like on our model) or a pair of skinny jeans.
MATERIALS
Bonatti yarn col. Graphite 300 g / 10.6 oz
Knitting needle n° 8 EU / 11 US
Knitting needle n° 5.5 EU / 9 US
Cables 40, 60 and 100 cm
Stitch markers: 1 for the start of the round, 3 for the increases of the
sleeves and 2 for the central motif.
KNIT-CROCHET STITCHES USED
Knit
Purl
Rib 1/1:
all rounds knit 1 and purl 1 to the end of the round.
Increases: knit front and back is advised.
SIZE
One - loose fitting
Measurements:
Chest 134 cm
Total height 45 cm
Height of the underarm 23 cm
Neck opening 30 cm
Width of the top part of the sleeve 25 cm
Length of the sleeve from underarm 37 cm
METHOD
Cast on 64 stitches with n° 8 mm needles, place the stitch marker at the start of the round and bind off in the round.
From 1 to 3 round: knit stitch
round 4: Place 3 stitch markers for the increases.
Carry out this passage like so:
Start of round stitch marker, knit 8, place stitch marker, knit 24, place stitch marker, knit 8, place stitch marker, knit 24.
round 5: dont do the increases yet, but place 2 stitch markers to delimit the central motif.
The front part in the middle is purled. These two place markers are needed to delimit the 16 stitches that need to be purled on the front of the sweater. We advise using different coloured stitch markers to those for the increase so as not to get mixed up.
Go ahead and place the stitch markers as so:
Knit 8, (pass the stitch marker) knit 4, place the stitch marker (different coloured one) for the central motif, purl 16, place the second stitch marker (different coloured one) for the central motif, knit 4 (pass the stitch marker) knit 8, (pass the stitch marker) knit 24.
Now were going to do the increases to shape the sleeves, the back and the front of the sweater. The increases are always done before and after each stitch marker. (excluding the two stitch markers for the central motif)
round 6: increase 1, knit stitch until 1 stitch before the stitch marker, increase 1, (pass the stitch marker) increase 1, knit stitch until the stitch marker of the the central motif, purl the 16 stitches, (pass the stitch marker of the central motif), knit stitch until 1 stitch before the stitch marker, increase 1, (pass the stitch marker), increase 1, knit stitch until 1 stitch before the stitch marker, increase 1, (pass the stitch marker), increase 1, knit stitch until 1 stitch before the stitch marker, increase 1. (=8 stitches increased in total)
round 7: knit all stitches apart from the 16 purled ones that are
.by two stitch markers of the central motif.
Repeat rounds 6 and 7 another 21 times
Now, the work so far consists of: 168 increases and 240 stitches in total on the needles.
In the next round leave the sleeves hanging as follows:
Leave 52 stitches on a thread (first sleeve), knit 26, purl the 16 stitches, then knit another 26, leave on hold the next 52 stitches (second sleeve) and knit another 68.
Note: take away the three stitch markers for the increases, only keeping the stitch marker for the start of the round and the two for the central motif.

Now were going to work on the body, on the needles there are 136 stitches in total. To make it easier well restart the numbering of the rounds from number 1.
Round 1: knit 26, purl 16, knit 94
Repeat the round 1 for 40 rounds.
Rib stitch 1x1 the last 6 rounds
Bind off loosely.
Pick up the 52 stitches left on hold previously to start working on the sleeves as so:
Knit the first 6 rounds
round 7: knit all the stitches and decrease 2 stitches.
Knit another 6 rounds (to get to round 13)
round 14: knit all stitches and decrease 2. (48 stitches on the needles)
From the 15 to 19 round: knit (5 rounds)
round 20: knit all stitches and decrease 2 stitches.
Repeat rounds 15 to 20 another 6 times (36 rounds to get to round 56)
On the needles there are 34 stitches.
From the 57 to the 59 round: knit all stitches
round 60: knit and decrease 2 stitches.
Now on the needles there are 32 stitches.
Switch to 5,5mm needles
Knit one round
Rib stitch 1x1 for 12 rounds.
Bind off loosely.
Repeat it all for the other sleeve.
Weve now come to the end of our tutorial on how to make a double face top down raglan sleeve sweater! It looks so soft and cozy and its wide collar, showing a bit of shoulder, adds a touch of seductiveness to the final look!
If youre rocking the raglan sleeves and are keen to carry on knitting, we suggest you check out the tutorial on how to make a raglan sleeve sweater.


WRITE A COMMENT