Christmas Photo Tutorial by Assunta - part 2

So, as promised, here are the remaining 3 Christmas Photo Tutorials by Assunta!

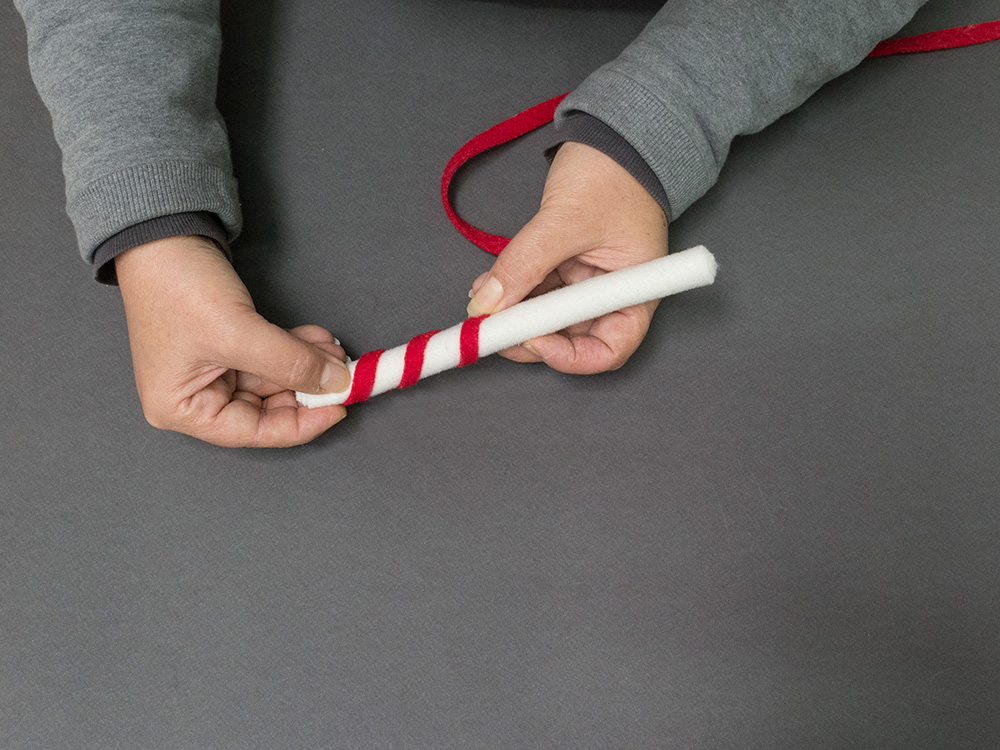
After the mitten, the gingerbread man, and the heart, we have these new projects: the candle, the snowflake and the candy cane.

We have nothing else to add except HAPPY CRAFTING and MERRY CHRISTMAS!

candela fiocco di neve bastoncino

Photo Tutorial by Assunta

MATERIALS
2mm / 150 cm thermoformable felt col. Red Carpet
2mm / 150 cm thermoformable felt  col. Milk
Glue
Scissors


2 mm Felt Color Card
2mm Felt Color Card
1 pc. € 32,04
150 cm / 2 mm Thermoformable Wool Felt
Milk
1 m € 18,96
5 m € 91,95
20 m € 360,23
OUTLET - 2mm Wool Felt Ribbon, 1 cm wide - 5 m
Cinnamon
1 pc. € 3,28
€ 4,68
30x30 cm / 2 mm Thermoformable Wool Felt Sheets
Red Carpet
1 pc. € 1,82
5 pcs. € 8,74
10 pcs. € 16,38
50 pcs. € 73,18
METHOD
IMG_0200IMG_0206IMG_0213IMG_0202

CANDLE

  • Cut two small flame shapes out of red felt. Make a V-shaped cut at the tip of each flame and glue the two points together. Attach the two pieces to obtain a flame
  • Take a 10cmx15cm rectangle of white felt. Make a small fold, glue it in place and attach the flame to one end. Roll the felt and glue it closed


IMG_0221 IMG_0220 IMG_0225 IMG_0233


  • Stand the candle on its end using a stand and, beginning underneath the flame, drip some hot glue onto the candle to make it look like dripping wax; the candle is finished


_DSC5980 _DSC5981 _DSC5982


  • Cut two strips of felt that are 0.50cm wide and 3cm wide. Take the first strip and fold it into a bow, but without making a knot. Glue it onto the base of a wooden clothespin


IMG_0234_1 IMG_0236_1 _DSC5995


  • Repeat this step with the other strip and cross the two half-bows to create a rosette


   IMG_0242 _DSC6001


  • Take some bunches of jute thread and tie them together to obtain a circle which we will glue to the center of the rosette


IMG_0244 IMG_0248


  • Take the candle and glue it to the base made out of these trimmings and finish it all off with a small border of red felt


_DSC6002 IMG_0252 IMG_0255


  • At this point, glue the candle onto the jute, pressing hard enough to secure it in place


_DSC6030_1 _DSC6025 _DSC6027 _DSC6015


SNOW FLAKE


  • Cut a 10cmx20cm rectangle out of white felt. Apply a strip of glue along the long side of the rectangle and make a small fold, rolling the felt until you’ve obtained a stick. Close the roll with glue


snow 01 copy IMG_0260 copy snow 3 copy IMG_0271 copy


  • Cut the stick into 13 1.5cm sections


snow 04 copy


  • Glue the obtained 13 pieces together, following the outline of the snow flake. Make sure to insert the ribbon from which the ornament will hang from the tree


IMG_0281 copy IMG_0287 copy IMG_0289 copy IMG_0293 copy


CANDY CANE


  • Cut a 10cmx20cm rectangle out of white felt di 10cmx20cm. Apply a strip of glue along the long side of the rectangle and make a small fold, rolling the felt until you’ve obtained a stick. Close the roll with glue.


IMG_0260 copy IMG_0271 copy


  • Cut out a strip of red felt from 5mm to 7 mm wide and 60cm long. Wrap the red strip around the stick in a spiral, gluing the ends into place


IMG_0303 IMG_0304 IMG_0305


  • Curve the stick and hold it in place with a cross stitch to give your ornament the desired shape


IMG_0315


  • Bake at 150° C for 5 minutes in a ventilated oven **, making sure that the white part of the candy cane does not yellow. When the candy cane cools, remove the cross stitch and use scissors to even out the ends


IMG_0323 IMG_0329


 * IMPORTANT: when baking thermoformable felt it is recommended to bake a test piece with your own oven to verify that the temperature and baking times are the same, otherwise they need to be adjusted


If you liked this article maybe you would also enjoy DIY Christmas – DHG style


WRITE A COMMENT